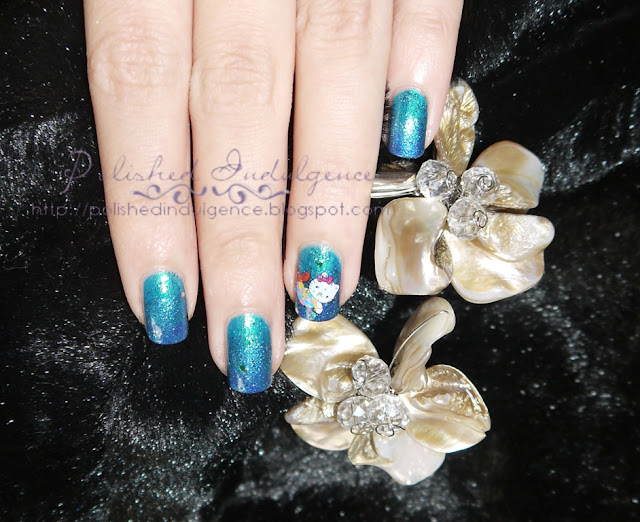
As seen using his handy dandy hamster powered submarine.
What I Used:
Base color: Sally Hansen Complete Manicure Calypso Blue
Turquoise base color: Quo by Orly Turquoise Moonlight (alternatively, Orly Halley's Comet, Zoya Charla or OPI Catch Me In Your Net)
Medium blue foil for sponging: Orly Sweet Peacock
Blue foil for sponging: Color Club Cold Metal
Green flakie top coat: FingerPaints Flecked
Blue, green and silver glitter: Revlon Blue Mosaic
Hello Kitty decal from Born Pretty Store
How I Did It:
***I've included both flash and non-flash photos of each step to make it easier to show the gradation of colors as they're so subtle that it might not be as obvious in different lights.
Step 1: After applying your favorite base coat to protect your nails and for better polish adherence, apply a thin coat of Calypso Blue. This will serve as the base color for the design. Don't worry if it's streaky or patchy. We'll be applying several more layers so one thin layer will suffice. Otherwise it will become too thick and the polish won't dry properly.
Step 2: Apply one coat of Turquoise Moonlight (or Halley's Comet or Catch Me In Your Net) over the entire nail. This will add more dimension with the glass flecks.
Step 3: Take a small bit of sponge (I used a cosmetic sponge applicator) and sponge on a layer of Sweet Peacock on only the lower 2/3 of the nail, close to the free end. Leave the upper 1/3 close to the nail bed untouched.
Step 4: Again, using a sponge (make sure it's clean or use a new one, if you want), sponge on a layer of Cold Metal on only the lower 1/3 of the nail close to the free end. Don't worry about blending as the colors we've chosen are subtle enough in their color variation, as well as we'll be adding a few more layers to meld them all together that it's not necessary.
Step 5 (optional): For ever more depth/dimension and to meld the sponged layers together, add one coat of Finger Paints Flecked.
Step 6 (optional): Once all the layers are dry, place the Hello Kitty mermaid water decal on to the accent nail. For our purposes, I placed it on the ring finger. Feel free to add more or not use it at all, whichever you prefer.
Step 7: To finish, add one coat of Blue Mosaic and top coat thereafter to seal everything in. The larger hex glitters in Blue Mosaic will mimic the air bubbles one might see underwater.
When we first got the idea to do this design, we wanted to make sure that the color gradation would be subtle so as to best convey the subtle color variations one would expect to see under the ocean. I suppose if you went deep enough, it would be very dark seeing as it would be far enough that the sunlight wouldn't reach it, but we were after just the color levels you might expect to see if, say, you went snorkeling.We wanted to make sure that it also had texture to mimic the movement of the water. The various glass flecks, flakies and various sizes of glitter served this purpose in that when you moved your hand, they'd catch the light in different ways. I was really excited with the way this turned out-- I really liked how smooth the transition between shades looked and how easily replicable this is.
Would Mermaid Kitty want to trade her fins for legs, do you think?
Love how it shimmers!
Of course I had to photograph it wet!
With a mother-of-pearl bangle Hammie got me to match the headband. (Hamster's got good taste!)
Happy Friday! Any plans involving the water this weekend (although I suppose it would still be too cold for that!)? Have you ever been diving or snorkeling? What's your favorite water sport?


This mani is soooo adorable!!! I love it. No water for me this weekend. I've never been diving or snorkeling. I'm too much of a chicken I gues, lol. My husband is more adventurous. He's done parasailing.
ReplyDeleteVery cute, Carmela! :) And I liked your step-by-step tutorial!
ReplyDeleteThanks so much, Marisa! :) Wow, parasailing! I'd love to try that, too, but I'm afraid of heights so there's that. :P We can be chicken together! Hahaha! :D I have tried wakeboarding tho but it was definitely one of those sports that SEEM easy but definitely isn't..
ReplyDeleteThanks, Mary! :D (I know you prefer seeing the actual steps but I tend to forget to photograph it, especially when I do freehand nail art, lol)
ReplyDeleteThis is so cute! I loved it when I saw it on Marta's blog :D
ReplyDeleteThank you, Anya! I'm glad you liked it. We really wanted to do something special for Marta's blog so we're happy it turned out so well. :)
ReplyDeleteOh goshh!! I am loving this !! Beautiful!
ReplyDeletehttps://www.primescuba.com/essential-equipment/scuba-packages.html